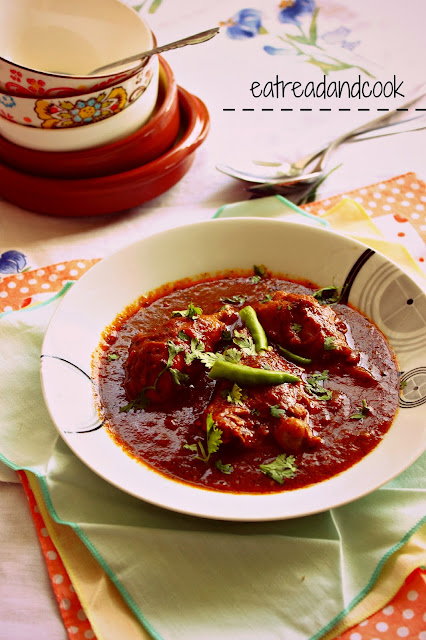
Old Memories and a different Chicken Curry ~ Kerala Chicken Curry
Well...okay...I used to hate Bori ~ Bengali sun dried dumplings. But now...its a complete different story!!! Like the Beauty And The Beast...what used to be a party crasher, now is my full time love. My fiesta with Bori started long back in my childhood, when I my grandma used to give Boris on the rooftop to dry under the scorching heat of the sun. Making Bori is a very long and tiresome process..and it takes in a lot of hard work. Traditionally, every Bengali household used to make their own Bori and pickles. But with the advent of time and the busy schedule of each and everyone in the family, making bori or naru (Bengali laddus) or pickles, is such a distant far cry, that it makes a total sense that why all these traditions are disappearing now a days. My mother, being a full time Business Woman, did not have time for all these. That is when I started hating boris. Because, store bought Boris did not have that crunch or taste, that the homemade ones have.
I had seen my grandma to make fine paste of different lentils with Shil Nora / grinding stone, as soon as the summer came in. This process was not easy as in order to make a fine paste, she had to grind the lentils more than 2 or 3 times, and the entire process was done by sitting bending and haunching on her back. A very long and tedious process. After that she whipped the lentils paste with her palms, until it expanded in size and took the form of whipping cream. Then she seasoned it with other spices and salt and gave shaped. Giving shapes to the bori is another process. She used to take some paste on her palm and closed it creating a fist. Then she turned the closed fist upside down, so that the thumb is in the downside. Finally she pressed a little so that the paste oozed out of the fist's small hole and when enough paste for a bori is out she cut the source by moving the thumb, and moved the fist to give another bori. Bori is traditionally given on a thin muslin/ cheese cloth, which used to be spread on a chouki / flat long table of short hight. When she finished giving shapes to the boris, they were left on the rooftop all day long for nearly 3-4 days. In the evening, those clothes with Boris were taken inside the house to prevent them from turning soggy. After the Bori was completely dried, she stripped them off from the clothes and put them in a glass jar. This process continued throughout the entire summer, until the rain started to give the family an abundant supply of boris, throughout the year.
But all these are the stories from the long past, which does not exist anymore. Now our pujas don't start with the fabulous aroma of narus (bengali style laddus) or no one make big batches of Malpua during Janmashtami and the family does not have a huge collection of different kind of pickles. Now we go to the supermarket and pick up Haldiram's pickle and sweets. Things really did change a lot in the last decade.
This year I bought some homemade Boris, before leaving India, and I am loving them. They are crunchy, tasty and brings back my childhood memories. Fine good old memories. I have bought Urad dal Bori, a different mix of lentils bori and motor dal / yellow split peas bori. Just fry them a little in the kadai with some oil, and they are ready to go with almost everything. I put them in the dal or fish curry. The simple vegetable curry just tastes so good with bori. Then there is also a spicy dry curry with bori and potatoes, called Borir Jhal which is one of my super favorite dish. Sometimes, I just eat steamed hot rice with a spoonful of ghee / clarified butter, green chili, salt and some crushed boris. Nothing... seriously nothing can be better, than this simple food.
That's a lot of my ramblings for today. Lets talk about today's recipe. Today I am sharing the recipe of Kerala Chicken Curry, which has completely changed my views towards the South Indian Cuisine. Its spicy and tasty and most importantly it does not have that pungent flavor of curry leaves, which although very aromatic, sometimes become a little daunting.
Kerala Chicken Curry
Serves 4
Ingredients:
- 2 chicken legs and 2 chicken breasts / 700gm chicken with bone
- 2 large onions - sliced
- 2 medium tomatoes - grind them to a fine paste
- 5-6 fat cloves of garlic - chopped
- 2, 2 inch ginger pieces - chopped
- 2 dry red chilies
- 8-10 fresh curry leaves
- 1 large cinnamon stick
- 3-5 green cardamom
- 1 and 1/2 tsp fennel seeds
- 3-4 cloves
- 6-8 black peppercorns
- 1/2 tbsp red chili powder (reduce the amount if you do not want that much heat)
- 2 tsp coriander powder
- 2 tsp turmeric powder
- 1 tbsp + 2 tsp coconut oil
- salt
Method:
- Heat 1 tbsp coconut oil in kadai/pan and add the whole spices, cinnamon stick, green cardamom. cloves, curry leaves, black peppercorn, fennel seeds and dry red chilies. As they start to sizzle and splutter add in the sliced onions and sauté till translucent.
- Now add the chopped ginger and garlic pieces and cook until the the onion becomes golden brown. By the time the raw flavor of the garlic will disappear too.
- Now add the turmeric powder, red chili powder, coriander powder and a little more oil, so that the spices do not burn. Cook for 2-3 minutes to ward off the raw flavor of the spices.
- When everything is done, put off the flame, take out the cooked mixture and keep aside to let it come down to room temperature.
- When it has cooled down, grind the mixture to a fine paste using a little water. The paste should be smooth in consistency and do keep a close eye that all the whole spices have turned into powder.
- Clean the kadai and heat the rest of the oil. Add in the created paste in it and add 1/4th cup of water.
- Add in salt and keep stirring to create a fine gravy. When the gravy starts to bubble add the tomato paste. Stir and cook until the tomato flavor is totally gone and the gravy starts to ooze out oil.
- Now add a little water and then add in the chicken pieces. Mix properly with gravy and put cover to let the chicken cook in its own juices.
- Cook until the chicken is completely cooked from inside. Do keep adding water little by little to avoid sticking to the pan and keep stirring in between.
- Cook in this way for 15-20 minutes, or until the chicken is done and then uncover the kadai / pan.
- Simmer until the gravy reaches your desired consistency. You can have a moderately thick gravy or thin gravy or dry gravy. Add water and simmer to have a thin gravy.
- Taste and adjust seasoning.
- Put off the flame and serve hot with steamed hot rice or chapati.


Comments
Post a Comment